Pages

Showing posts with label Weaving. Show all posts

Friday, 3 June 2011

Motions of Loom | Weaving Loom Motion | Primary Motions of Loom | Secondary Motions of Loom | Tertiary Motions of Loom


In order to interlace wrap and weft threads to produce a fabric, the following motions are necessary on any type of loom:
1. Primary motions
2. Secondary motions
3. Tertiary motions

1. Primary Motions:
These are fundamental or essential mechanisms. Without these mechanisms, it is practically impossible to produce a fabric. It is for this reason that these mechanisms are called ‘primary’ mechanisms. The primary mechanisms are three in number.

a. Shedding mechanism
b. Picking mechanism
c. Beat-up mechanism

2. Secondary Motions:
These mechanisms are next in importance to the primary mechanisms. If weaving is to be continuous, these mechanisms are essential. So they are called the ‘secondary’ mechanisms. They are:
  1. Take-up motion
  2. Let-off motion
3. Tertiary Motions:
To get high productivity and good quality of fabric, additional mechanisms, called auxiliary mechanisms, are added to a loom. The auxiliary mechanisms are useful but not absolutely essential. This is why they are called the ‘auxiliary’ mechanisms. These are listed below.
a. Weft stop motion
b. Warp stop motion
c. Warp protector mechanism
d. Weft replenishment / Warp mixing motion
e. Cutter
f. Temples
g. Brake
h. Selvedge

Thursday, 2 June 2011

Principle of Negative Tappet Shedding Mechanism

Principle
A tappet is given a rotary motion so that it depresses a follower and a lever, known respectively as the anti-friction bowl and the treadle arrangement, by means of which the heald shaft is operated.

Construction
Figure shows a negative tappet shedding mechanism. A pair of tappets A and B are fixed to the bottom shaft C at 180 degrees to each other. Two treadle levers D and E are connected to the loom back-rail by a bracket F.

The bracket acts as a fulcrum for the levers. The two treadles have teeth to carry the lamb rods G and H respectively. Two heald shafts J and K are connected to the lamb rods. A top reversing roller shaft Q carries two rollers of different diameters. The roller of small diameter N is connected to a leather strap L to which the front heald shaft J is connected. The roller P of large diameter is connected to a leather strap M to which the back heald shaft K is connected. The tappets A and B touch the anti-friction bowls or followers R and S respectively, which are fixed to the treadle levers.
Figure : Negative tappet shedding mechanism
The heald shafts have heald eyes T and U through which the war p threads pass X is the war p sheet and Y is the cloth. The odd ends are passed through one heald shaft while the even ends are passed through the other heald shaft.

Working Process:
When the bottom shaft is rotated in the clockwise direction as shown in the figure, the tappets are also rotated. The tappet will depress the anti-friction bowl and the treadle. Being fulcrumed at one end, the front portion of the treadle moves down. This action is transferred to the lamb rod, the heald shaft and the leather strap. So one heald shaft is lowered and the threads connected to this heald shaft are lowered and form the bottom layer of the shed.

The leather straps attached to the reversing rollers are connected in opposite directions, i.e. when leather strap is pulled down, it is unwound from its roller. The shaft therefore rotates in the clockwise direction and the other leather strap is wound on to its roller. The heald shaft is raised and therefore the lamb rod and treadle lever are also raised. The threads connected to the heald shaft are also raised and form the top layer of the shed.

For the next shed, the other tappet works with the other set of bowl, treadle, lamb rod, heald shaft, strap and roller and the other heald shaft is lowered. The first heald shaft is raised by the top reversing rollers, and the positions of the healds shafts are thus interchanged. Thus, for one rotation of the bottom shaft, two sheds are formed.

In this type of tappet shedding therefore, one tappet depresses the concerned treadle and the corresponding heald shaft is lowered. But the other heald shaft is raised by means of the top reversing rollers. So this type of shedding mechanism is known as “negative tappet shedding mechanism”

Timings and Settings:
  1. Turn the crank to the top centre position.
  2. Fix the anti-friction bowls to the treadle levers; they should move freely in the slots.
  3. Fix the treadle levers with a bracket to the back rail of the loom.
  4. Set the grid and grid bracket to the front rail of the loom in the slots of the grid.
  5. Make sure that the tappet with the lower throw is fixed to the bottom shaft at the starting handle side.
  6. Fix the top reversing rollers to the top reversing roller shaft to be equidistant from the ends and at the same time ensure that the connecting screws of the rollers are symmetrical about the central axis of the shaft when the heald shafts are at the same level. The roller of smaller diameter is always connected to front heald shaft.
  7. The heald shafts are connected to the top reversing rollers by means of cords and leather straps. The leather straps are connected to the rollers, such that when one of them winds on its roller the other strap unwinds from its roller and vice versa.
  8. Lamb rods are connected to the heald shafts by cords.
  9. Adjust the tappets on the bottom shaft and make sure of the following points :
  • The tappet with a bigger throw should be connected to the back heald shaft.
  • The bowls should have perfect contact with the tappet surfaces.
  • The treadles should be at the same level and parallel to each other at the top centre position.
Heald shafts : The hook of the lamb rod of the front heald shaft should be connected to the first notch of the treadle lever while that of the back heald shaft should be connected to the third notch. If the depth of shed is altered, the connections of the hooks to the treadle levers can be changed.

Points to be Observed:
  1. Turn the crank shaft through two revolutions and make sure that the bowls are always in contact with the tappets.
  2. The heald shafts should not touch the side frames or the sley.
  3. Turn the crank shaft to the bottom centre and check the size of shed. The bottom line of warp sheet or the heald eyes of the lowered heald shaft should have a clearance of 1 mm from the race board and the top.
 

Wednesday, 1 June 2011

Weaving | Weaving Mechanism | Classification of Weaving Machines

Weaving:
The process of producing a fabric by interlacing warp and weft threads is known as weaving. The machine used for weaving is known as weaving machine or loom. Weaving is an art that has been practiced for thousands of years. The earliest application of weaving dates back to the Egyptian civilization. Over the years, both the process as well as the machine has undergone phenomenal changes. As of today, there is a wide range of looms being used, right from the simplest hand loom to the most sophisticated loom.


Classification of Weaving Machines:
Weaving machines are classified according to their filling insertion mechanism. The classification is as follows:
 
1. Shuttle
2. Shuttle-less

  • Projectile
  • Rapier
  • Air-Jet
  • Water-Jet
Shuttle Weaving
In shuttle weaving, a shuttle that traverses back and forth across the loom width, inserts the filling. Shuttles can be made of wood or plastic. Filling yarn is wound on the quill and the quill is placed in the shuttle. As the shuttle move across the loom, the filling yarn is unwound from the pirn and lay in the shed.

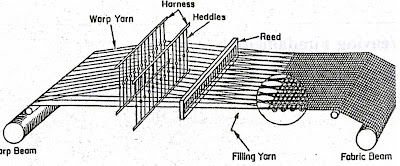
Fig: Basic Weaving Mechanism
Projectile Weaving
Projectile weaving machines use a projectile equipped with a gripper to insert the filling yarn across the machine. The gripper projectile draws the filling yarn into the shed. The Projectile glides through the shed in a rake- shaped guide. Braked in the receiving unit, the Projectile is then conveyed to its original position by a transport device installed under the shed.


Fig: Projectile Weaving
Rapier Weaving
In Rapier weaving, a flexible or rigid solid element, called rapier, is used to insert the filling yarn across the shed. The rapier head picks up the filling yarn and carries it through the shed. After reaching the destination, the rapier head returns empty to pick up the next filling yarn, which completes the cycle. A rapier performs a reciprocating motion.

Picture: Weft insertion by rapier

Rapier weaving machines can be of two types:

1. Single Rapier Machines: A single, rigid rapier is used in these machines. The rigid rapier is a metal or composite bar usually with a circular cross section. The rapier enters the shed from one side, picks up the tip of the filling yarn on the other side and passes it across the loom width while retracting. Therefore, a single rapier carries the yarn in one way only and half of the rapier movement is wasted. Also there is no yarn transfer since there is only one rapier. The single rapier’s length is equal to the width of the loom.

2. Double Rapier Machines: Two rapiers are used in these machines: one rapier, called the giver, takes the filling yarn from the yarn accumulator on one side of the loom, brings it to the center of the machine and transfers it to the second rapier which is called the taker. The taker retards and brings the filling yarn to the other side. Similar to the single rapier machines, only half of the rapier movements are used for filling insertion.

Air-Jet Weaving
The air jet weaving machines are the weaving machines with the highest weft insertion performance and are considered as the most productive in the manufacturing of light to medium weight fabrics, preferably made of cotton and certain man-made fibers (sheets, shirting fabrics, linings, taffetas and satins in staple yarns of man-made fibers); it has anyway to be pointed out that technically positive results are obtained at present also with heavy weight fabrics (denims) and that some manufacturers produce also machine models for terry production.


Fig: Air-Jet Weaving

These machines are the ideal solution for those who want to produce bulk quantities of customized fabric styles. The weaving widths range generally from 190 to 400 cm. As regards the multicolor weft carrier, up to 8 different wefts can be fed. It has however to be considered that the air jet weaving machines require a high energy consumption to prepare the compressed air and that this consumption rises definitely with increasing loom width and running speed. The reduction in the energy consumption is in fact one of the main concerns of the manufacturers, and builds for the user an important selection criterion.

Water-Jet Weaving
A water-jet weaving machine inserts the filling yarn by highly pressurized water. The relative velocity between the filling yarn and the water jet provides the attractive force. If there is no velocity difference, then there would be no tension on the yarn results in curling and snarling of the yarn. Water-jet weaving machine can only be used for hydrophobic fibers.

Fig: Water-Jet Weaving